3D Printable Human Brainstem Model
Welcome to the Brain stem model page. Here you can download the full 3D model of the human brain stem.
About this Model
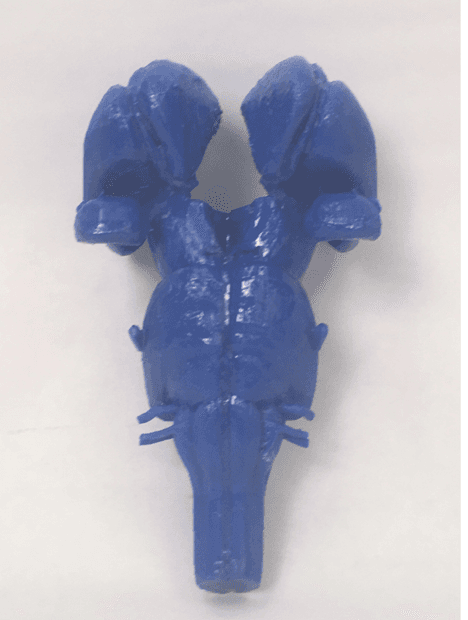
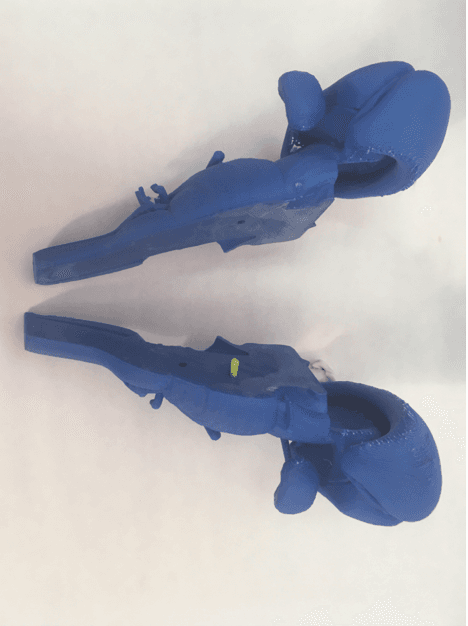
This model represents the human brainstem and associated deep brain structures and cranial nerves. It was created from anatomical data and is designed as a two-piece model for 3D printing.
Included Structures
- Amygdala
- Brachia of the superior and inferior colliculi
- Caudate nucleus
- Cerebral aqueduct
- Cerebral crus
- Facial nerve
- Globus pallidus
- Hypoglossal nerve
- Inferior colliculus
- Internal capsule
- Medulla oblongata
- Oculomotor nerve
- Pons
- Putamen
- Red nucleus
- Substantia nigra
- Superior colliculus
- Trigeminal nerve
- Vagus nerve
The model is divided into two halves.
The delicate nerve structures were thickened to improve their durability during printing.
3D Printing Instructions
File format: STL
The model is supplied as two STL meshes for printing. Additional formats are available on the source page for other uses.
Available files
Part 1Part 2
The exact settings depend on the printer, nozzle, filament and desired level of detail.
Choosing Your Print
Print both halves and assemble them to create the complete brainstem model.
Recommended for:
- Anatomy teaching
- Neuroanatomy demonstrations
- Examining spatial relationships between the brainstem, deep structures and cranial nerves
The two halves can be printed separately, making it possible to test the print orientation, scale, supports and material before completing the full model.
Recommended for:
- Initial test prints
- Checking print quality
- Demonstrating individual anatomical surfaces
Files & Software
- Download both STL files from the NIH 3D model page.
- Keep Part 1 and Part 2 together and ensure they are not accidentally scaled differently.
- Use a slicer such as OrcaSlicer, PrusaSlicer, Bambu Studio, SuperSlicer, Cura or equivalent.
- Verify that both parts are at 100% scale and use the same units before slicing.
- Arrange each half with its large cut/interface face on the build plate.
- Orient the parts to minimize unsupported overhangs around delicate nerves and projecting anatomical structures.
- Inspect the sliced model layer-by-layer, paying particular attention to the nerves, guide holes and mating surface.
Printing the Brainstem
- 1Load both STL files into your slicer.
- 2Confirm that both halves are at exactly the same scale and use the same units.
- 3Place each half with its large cut/interface face on the build plate.
- 4Orient the parts to minimize unsupported overhangs around delicate anatomical structures.
- 5Generate minimal supports, adding targeted supports only where the slicer identifies genuinely unsupported regions.
- 6Preview the entire toolpath before printing.
- 7Pay particular attention to the thin nerve structures, guide holes and mating surfaces.
- 8Print both halves using identical core print settings.
- 9Allow the parts to cool before removing them from the build plate.
Supports & Delicate Anatomy
- The nerve structures and other small projections are more vulnerable than the main body of the brainstem.
- Prefer changing the orientation rather than adding extensive supports.
- Use targeted or tree-style supports where appropriate.
- Avoid placing dense support material directly on recognizable anatomical surfaces.
- Remove supports gradually rather than twisting them away from delicate structures.
- Inspect the sliced preview carefully before printing.
Aligning and Joining the Two Halves
- 1Dry-fit the two halves without adhesive.
- 2Check that the anatomical surfaces meet cleanly and that the guide holes align.
- 3If alignment pins are used, test their fit before assembly. Do not assume a specific pin diameter.
- 4Apply a small amount of suitable adhesive to the mating surface.
- 5Join the halves slowly, using the guide holes to maintain alignment.
- 6Hold or lightly clamp the assembly until the adhesive has set.
- 7Remove excess adhesive before it fully cures.
- The original build used ABS dissolved in acetone to join the two halves.
- If using a solvent or adhesive, follow the relevant safety instructions and use a method appropriate for the filament being printed.